Aquarium stands can be one of the most visually striking pieces to your aquatic setup. Though they have a minimal part in the hobby they usually match the size of our giant hundred-gallon tanks so they are a little hard to miss. This means we want to have a stand that won’t be an eyesore when paired with our lovingly curated saltwater aquarium. But have you ever gone shopping for an aquarium stand? They are so expensive. The amount of money you would spend on a single stand for a 30-gallon tank could buy you the supplies you needed to make a stand for a 70-gallon tank. This is one of those moments where you are paying for the luxury to not have to build the stand yourself but if you are willing to do the work you can save quite a bit of money by building your own stand.
The hobby can be expensive enough without us making it even harder on our wallets. Stands can be as easy of a project as you would like them to be. If you are only trying to make a stand that will support the weight of your aquarium then you will have no trouble finishing the project. Follow our guide below on how to carry out this project but make sure that you read our tips beforehand so you can go into this project with as much background knowledge as you may need.
DIY Tank Stand - Step-By-Step Guide
For this guide I’ll be building a stand for the 32 Gallon Fiji Cube. Its dimensions are 23.62″L x 19.69″W x 15.75″H. The stand I’ve designed includes an additional 1/2″ of platform on all sides of the aquarium. This gives it a little wiggle room.
You’ll need to adjust dimensions to match your aquarium but this guide will give you everything you need to know to build a strong stand that will be more than capable of supporting the enormous weight of the glass and water.
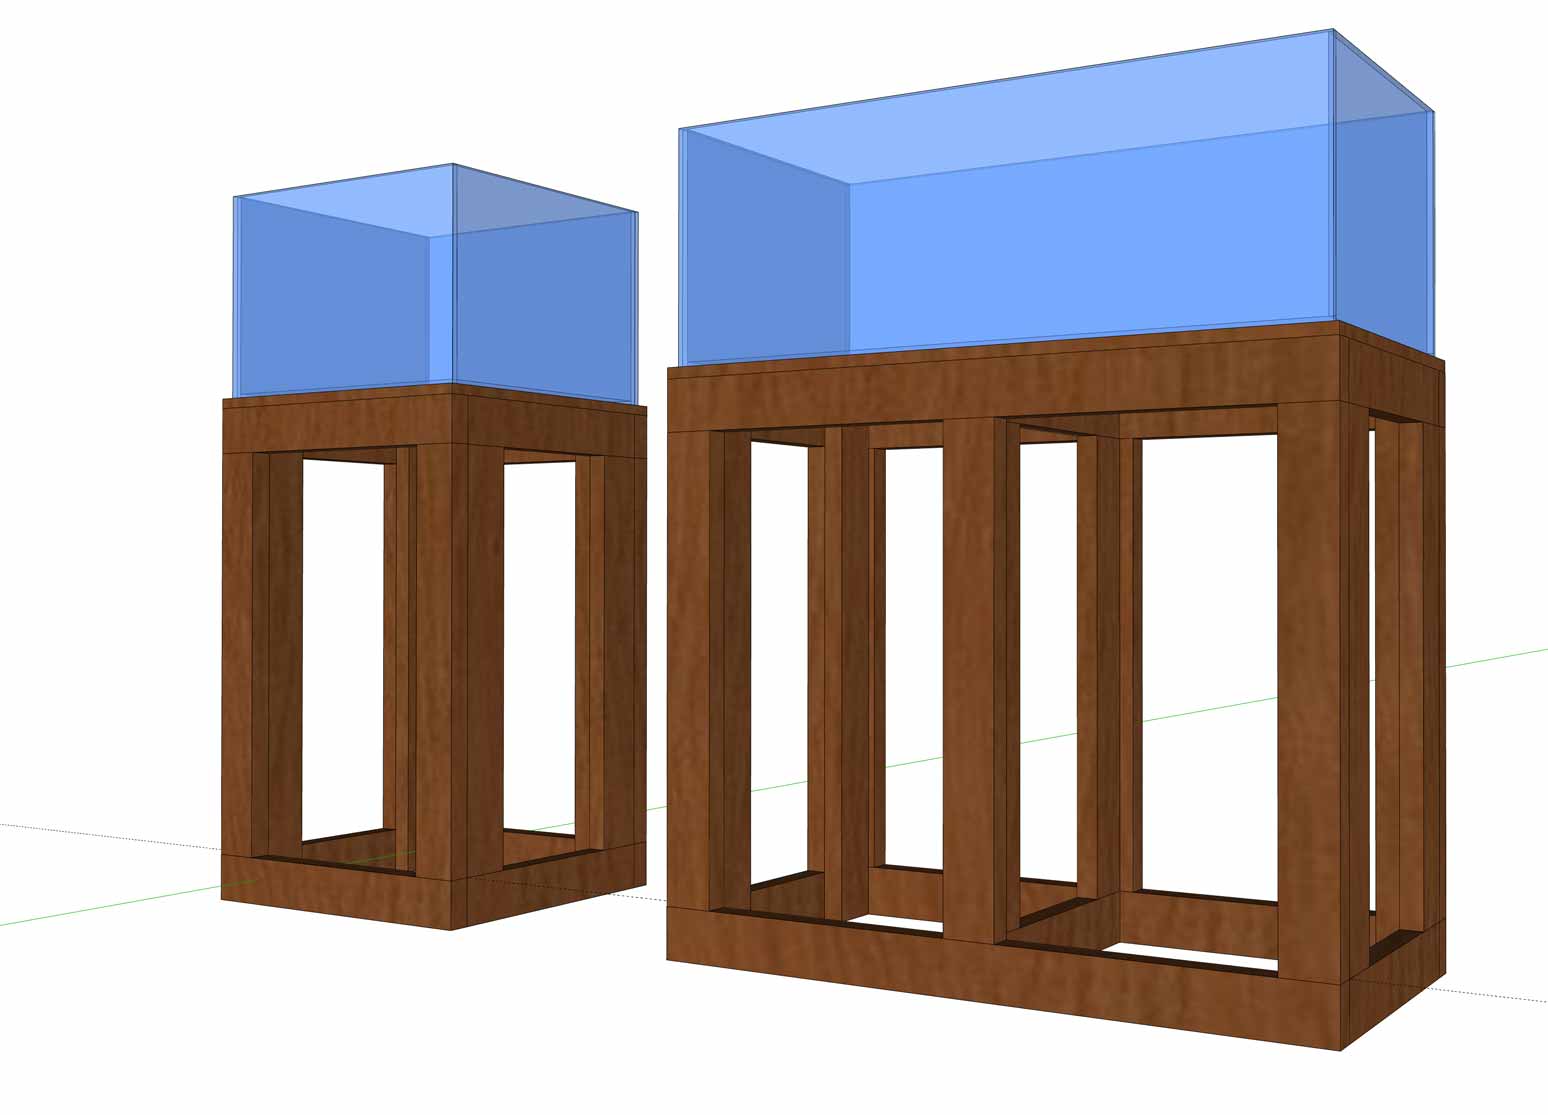
If the aquarium you’re building a stand for is more rectangular you can extend the stand width and include a center brace similar to those on the corners. If your aquarium is very wide you may even want to include more than one center brace. If you keep the sections roughly square (like in the image above) the stand strength should be overkill.
It should be pointed out that even if you build a stand capable of supporting the weight of your aquarium when filled, you should make sure your floor can handle the weight as well.
Let’s dive into the step-by-step guide.
Step 1: Measure Your Aquarium & Plan
Measure the dimensions of your saltwater aquarium so that you know exactly what to buy when you head over to Home Depot. A starting size for a DIY aquarium stand is making it the same size as your tank but with ½ inch added to each side. That way the tank will be held between the sides of the aquarium stand when you are all done and will be a lot more secure than just resting on the top of some wood. After you know what the perimeter of your aquarium stand should look like you shouldn’t have much issue with mapping out the rest of the dimensions.
If your tank is 3 feet long and 5 feet wide then you should measure the length of your pieces to be that half-inch beyond either side of the tank. Once that clearance has been marked, you can begin to measure the 4 pieces you need for the width. These pieces will be going between the length pieces but you should still be ensuring that there is that half-inch clearance on all sides.
You can alter the dimensions as you see fit as this is just a guideline and not the one all be all of DIY aquarium cabinet designs. If this design works for you that is fantastic but it’s okay to step off the beaten path.
Rectangular aquariums will need a middle support like the stand on the right in the image above. If your aquarium is very wide you may even need to add an additional support. If you think of the squarish stand that I’m building as a basic building block and then simply stack them side by side to extend the width to meet your need you should be fine.
I highly recommend a very user-friendly 3D program to plan out your aquarium design – Sketchup. It’s easy to use and it’s FREE! It runs right in your web browser so you don’t even need to install any software. The images I’ve included in this post are all renders from Sketchup. Spending a little time piecing together your design in 3D will help you realize problems before you begin cutting and assembling in the real world. It’ll save you time and money.
Step 2: Collect Your Tools & Supplies
I’ll go over the minimum tools required to get the job done. I’ll also include a list of lumber required to build the stand for the 32-Gallon Fiji Cube. While your tank won’t be the same size most likely, you should be able to easily adjust this plan to accomodate any size tank.
- Circular, Chop, or Table Saw – Accurate cuts are critical to building a stand that will be properly square and strong. This is difficult with a circular saw but much easier with a chop or table saw.
- Drill/Screw Driver – A good electric drill/screw driver with some torque can make the difference between a job done and a job well done.
- Wood Screws – A box of screws should be enough to put everything together.
- Wood Glue (Optional) – Not required but can add a little more structural integrity.
- 2x4s – 8 2x4s should be enough to build the stand for the 32-gallon Fiji Cube. Be sure to select the straightest pieces. 2x4s can often be subtly warped. Sometimes even quite obviously warped. It’s worth taking a look down the length of the few 2x4s you need to try to get the straightest boards you can.
- Plywood – One sheet is more than enough for the platform and the rest can be used if you’d like to add sides and a door. I recommend going with 3/4 inch thick plywood if your budget allows.
Tip: Cutting large sheets of plywood accurately can be difficult without more expensive saws. Most lumber stores (like Lowe’s or Home Depot) will have a saw specifically for cutting down plywood sheets. If you’re nice you might be able to get your plywood sheet cut down to the dimensions you need, or atleast cut down to one of the dimensions.
Step 3: Cut Your Wood To Size
You should have measurements for all of your boards from the planning step. Review once more to make sure everything is good to go. This is especially important if you haven’t used a tool like Sketchup to plan your stand design.
It’s important to cut your tank stand components as accurately as possible. Measure twice and cut once can’t be overstated. If you can stack 2x4s and cut multiple identical length pieces at the same time it’s a very good idea.
Since minor variances can make the difference between a good job and a great job, I think it’s worth spending a few minutes watching the video below from a pro woodworker on how to cut accurately.
This may seem like overkill for a simple aquarium stand but when you begin assembling I think you’ll begin to understand the wisdom of being as accurate and consistent as you can be when cutting.
Step 4: Assemble The Top & Bottom Frames
We’ll begin assembly by screwing together the top and bottom frames that the main supports will attach onto. These are just simple squarish boxes made from cut down 2x4s. Making these boxes as identical as possible will not only make the stand look better but will make it stronger and easier to attach the supports.
Tip: Using an inexspensive 90 degree clamp can make screwing these pieces together much easier and much more accurate.

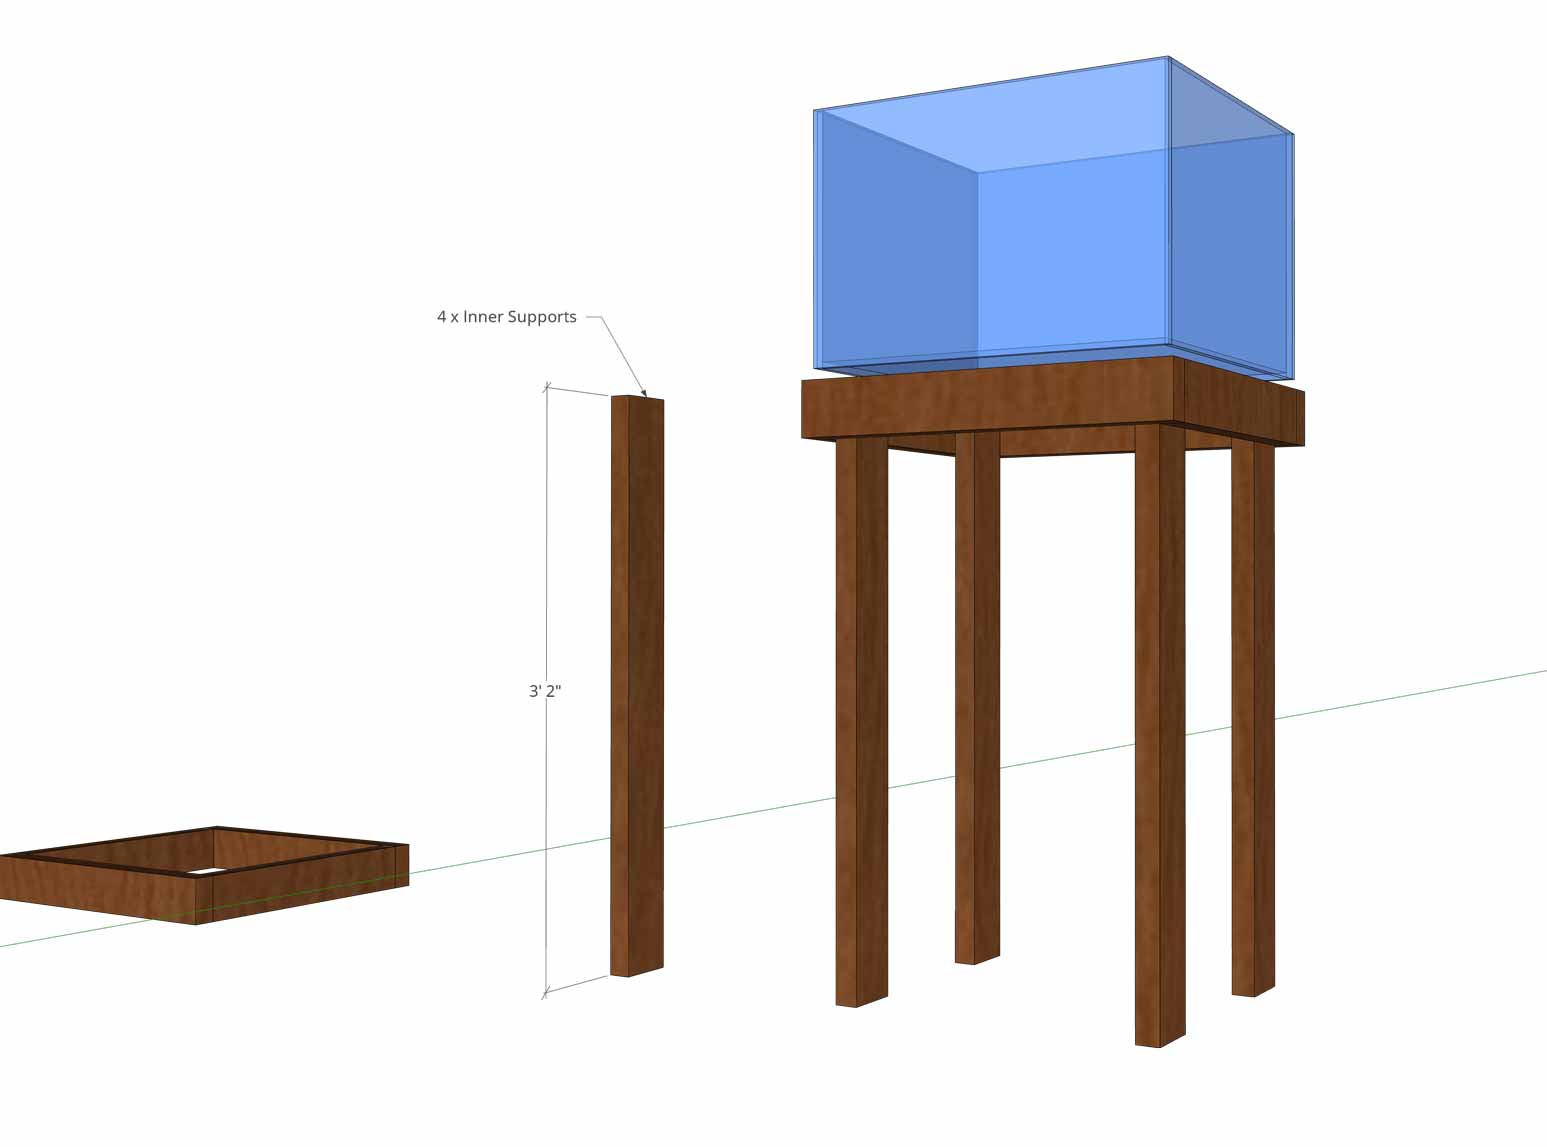
Step 5: Attach The Inner Supports To The Top Frame
Next, attach the 4 inner supports to the top frame. We’ll attach the bottom frame later so set it aside for the moment.
These are also 2x4s that have been cut to length.
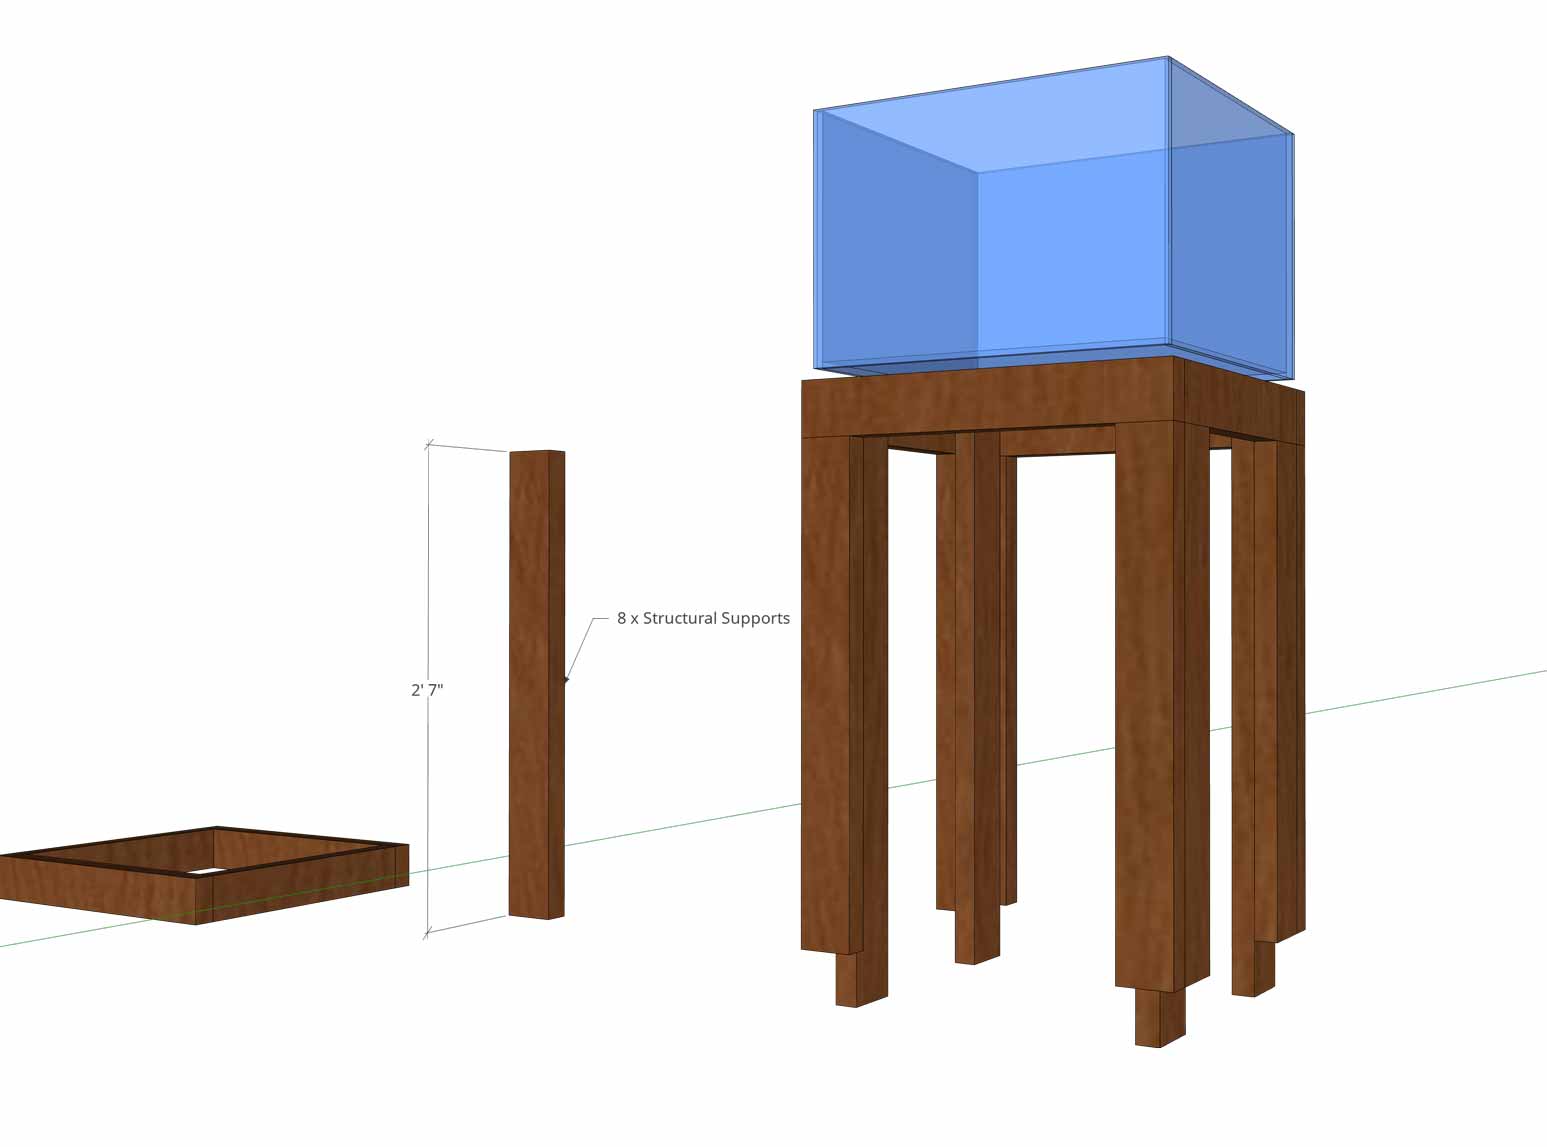
Step 6: Attach The Structural Supports To The Inner Supports
Now attach the structural supports to the inner supports at each corner. Without the structural supports, all of the weight would be carried by the screws holding the inner supports to the top frame. While the screws are very strong, the weight of the aquarium would likely be too much for them.
Again, these are just 2x4s cut to length.
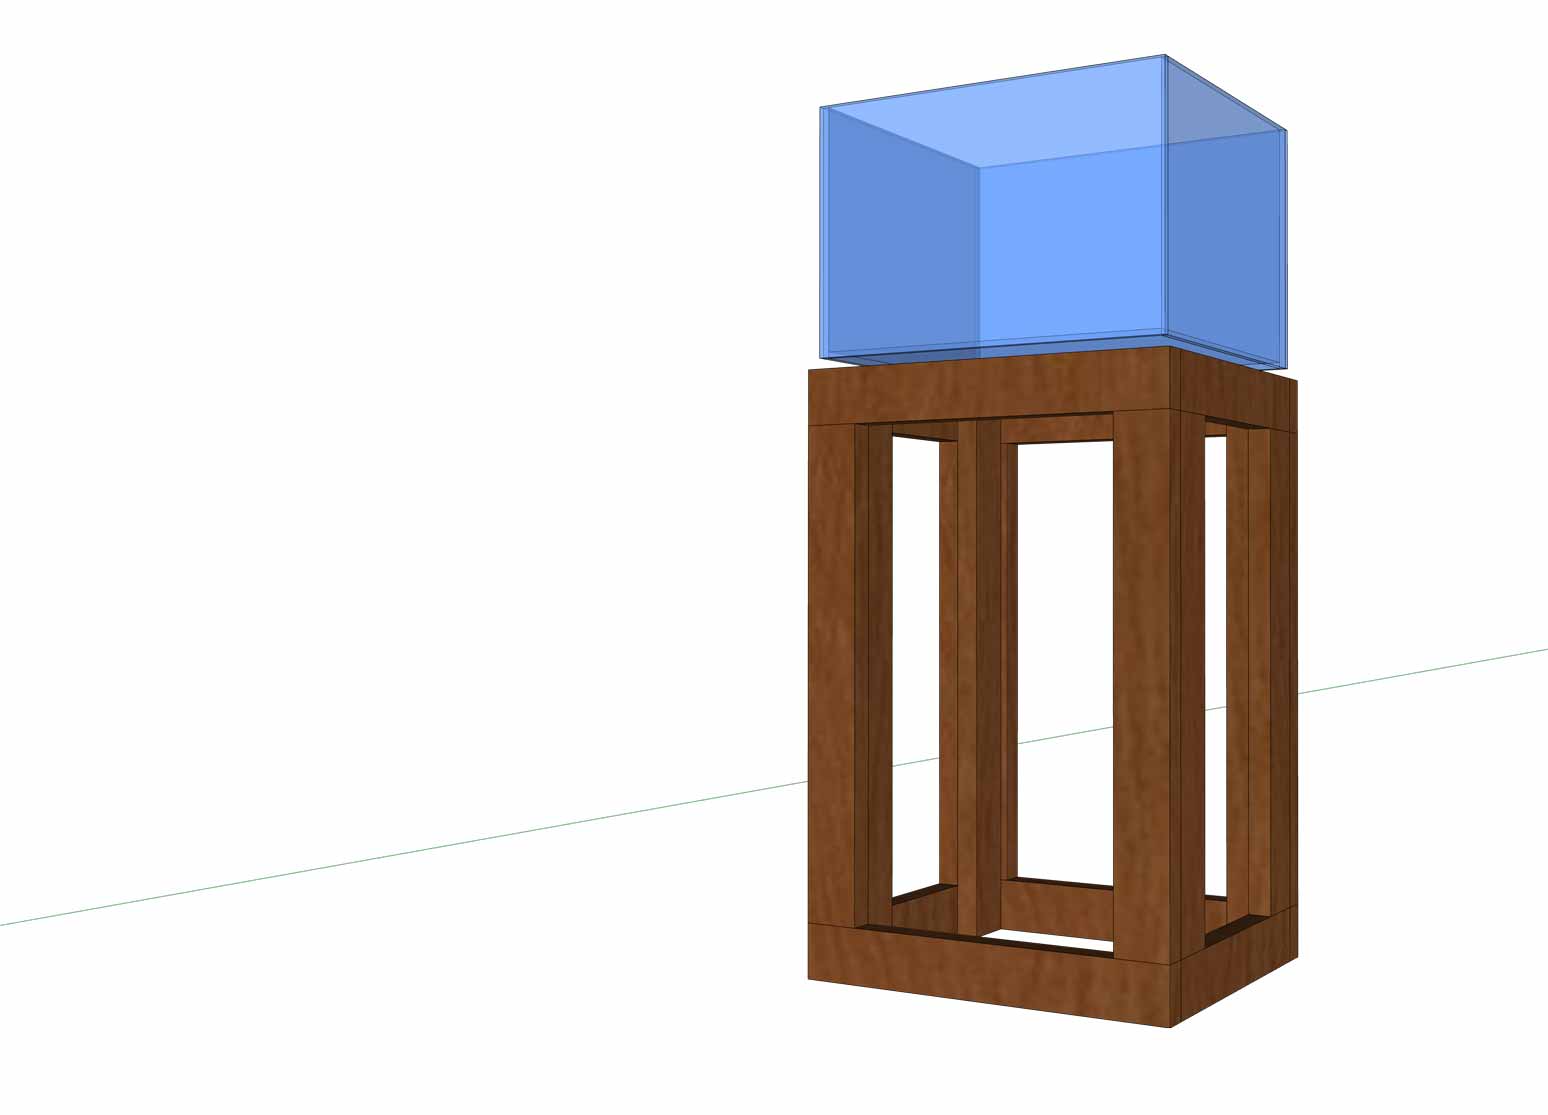
Step 7: Attach The Bottom Frame To The Inner Supports
It’s now time to add the bottom frame. Slide it around the bottom inner supports and up against the structural supports. If all of your supports are accurately measured and cut everything should align perfectly.
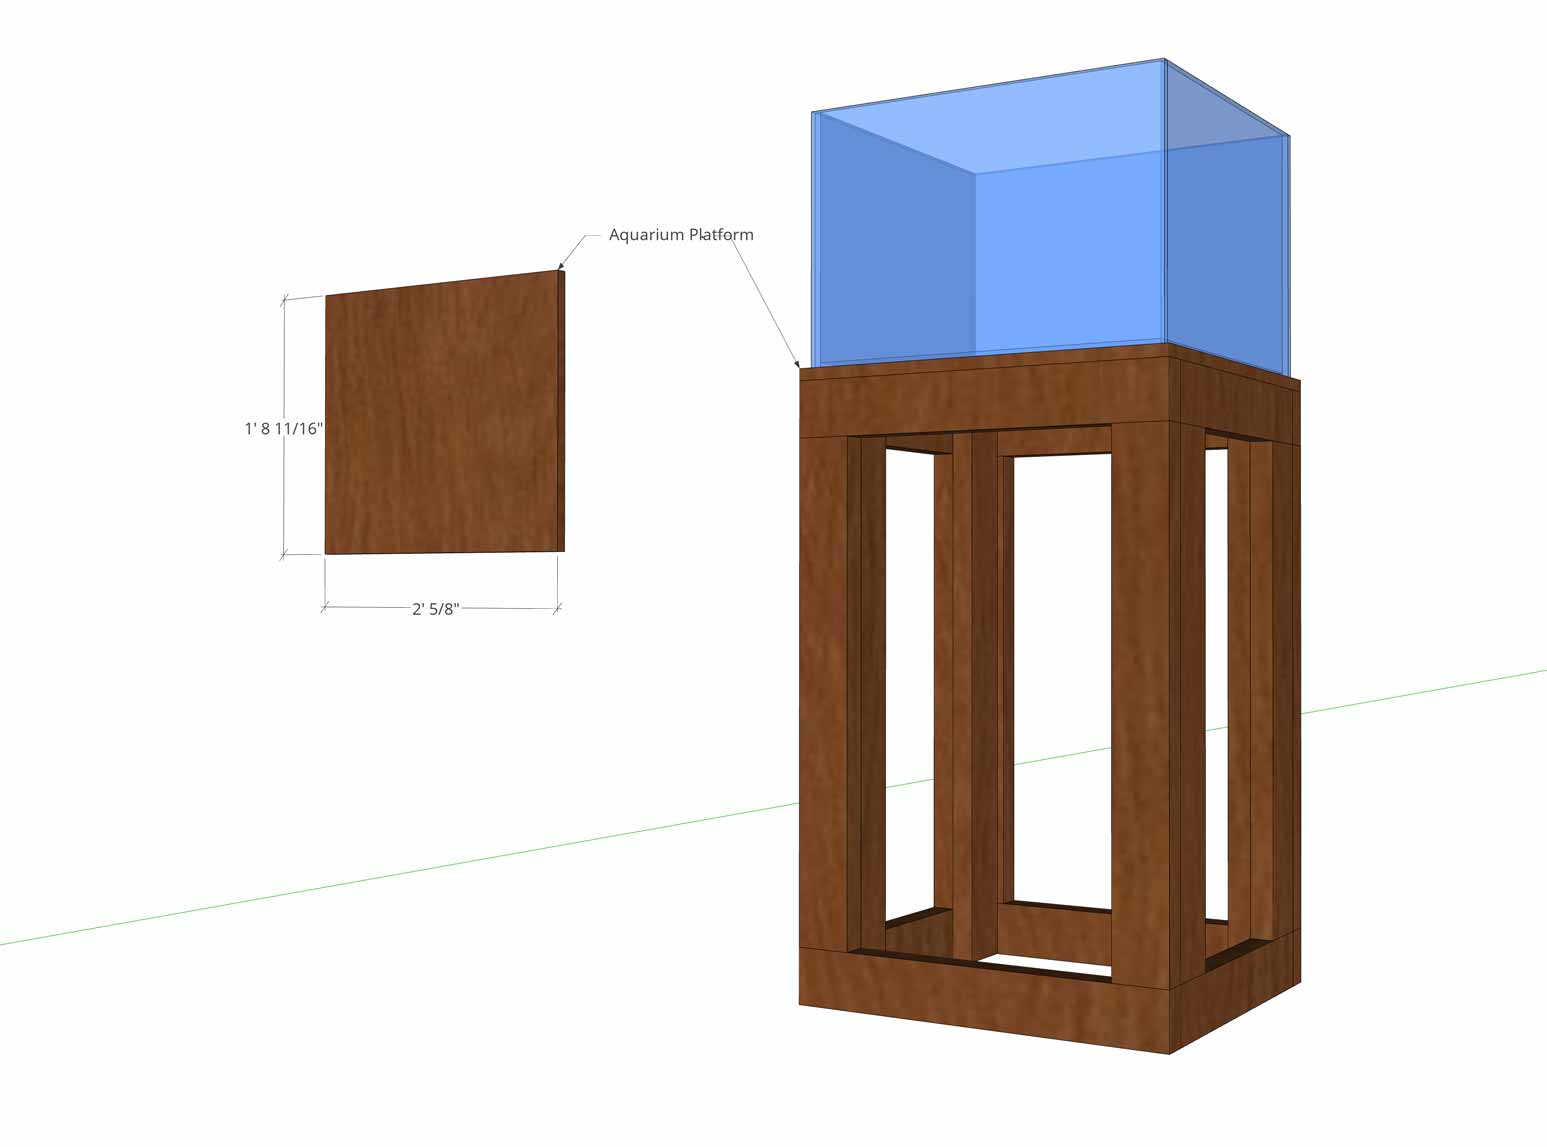
Step 8: Attach The Platform To The Top Frame
The last critical piece to attach is the platform that the aquarium will sit on. If the stand has been assembled accurately and the platform cut accurately then the two should line up perfectly.
This is simply plywood cut to size. Thicker is better for support.
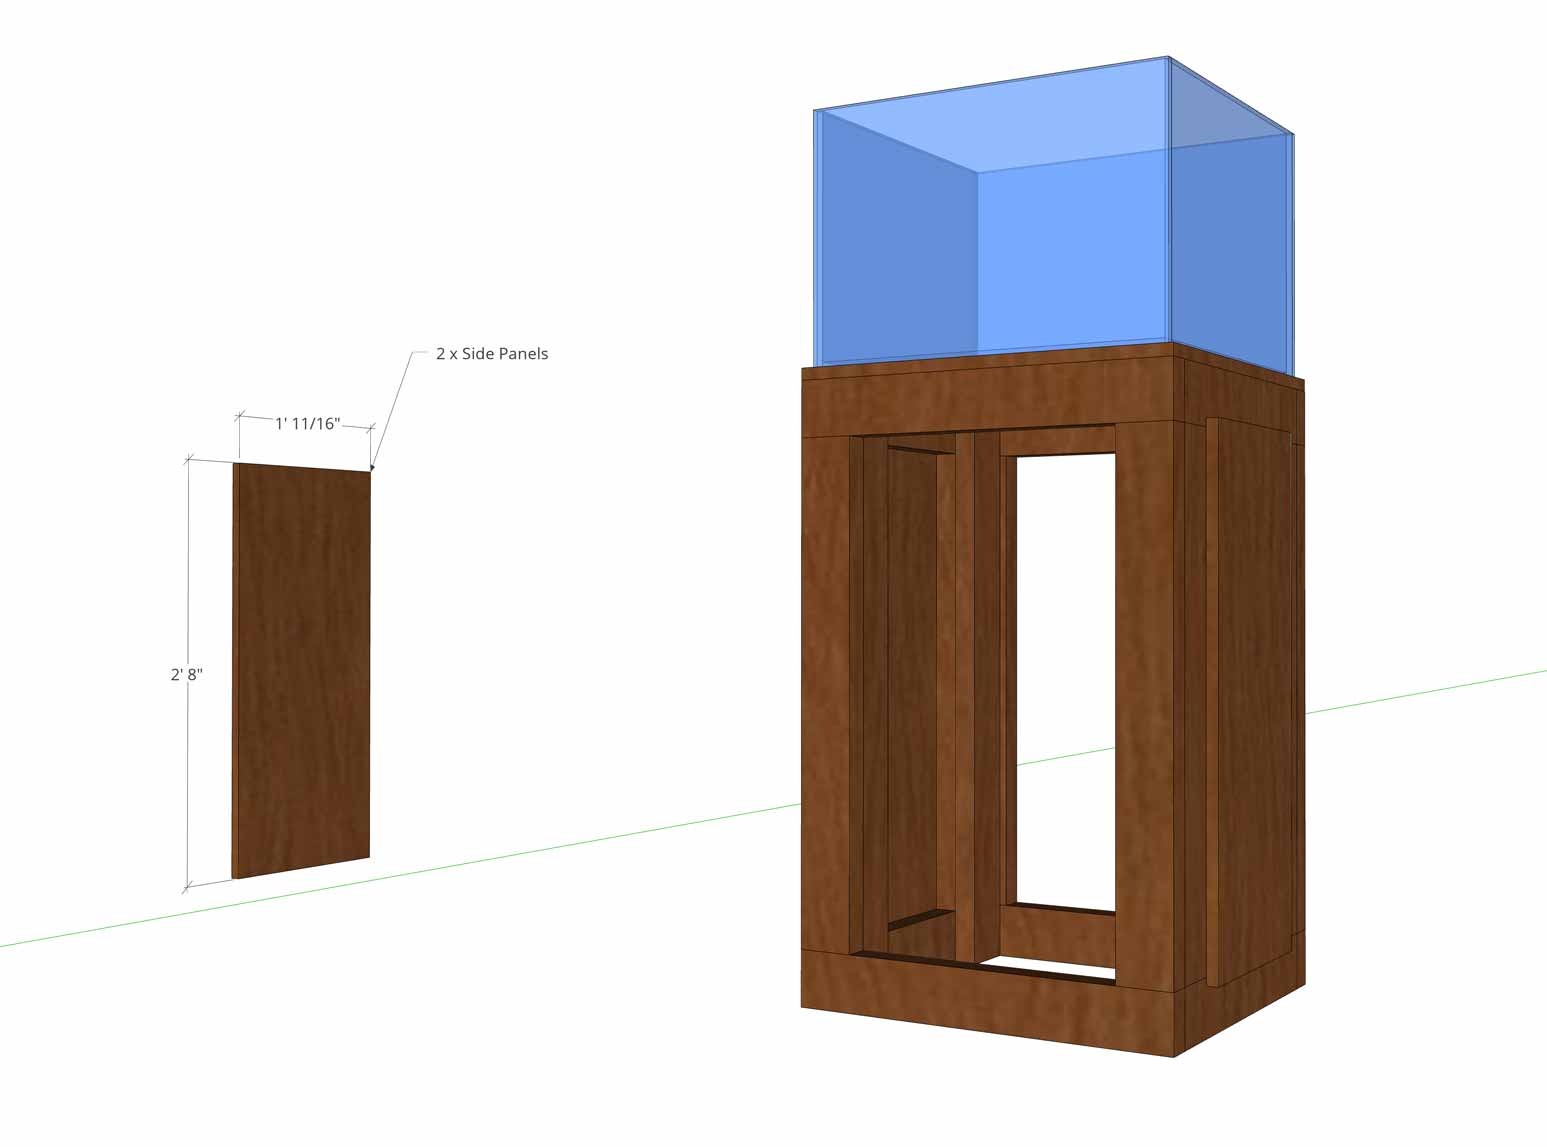
Step 9: Attach The Side Panels (Optional)
Some may want to enclose their stand. If so you can attach side panels. If you want to get advanced you can use hinges to allow them to swing outward to allow you to more easily access equipment and other items you may have stored inside.
Most will want to leave the back uncovered so that plumbing can be run from the aquarium on top down to a sump.
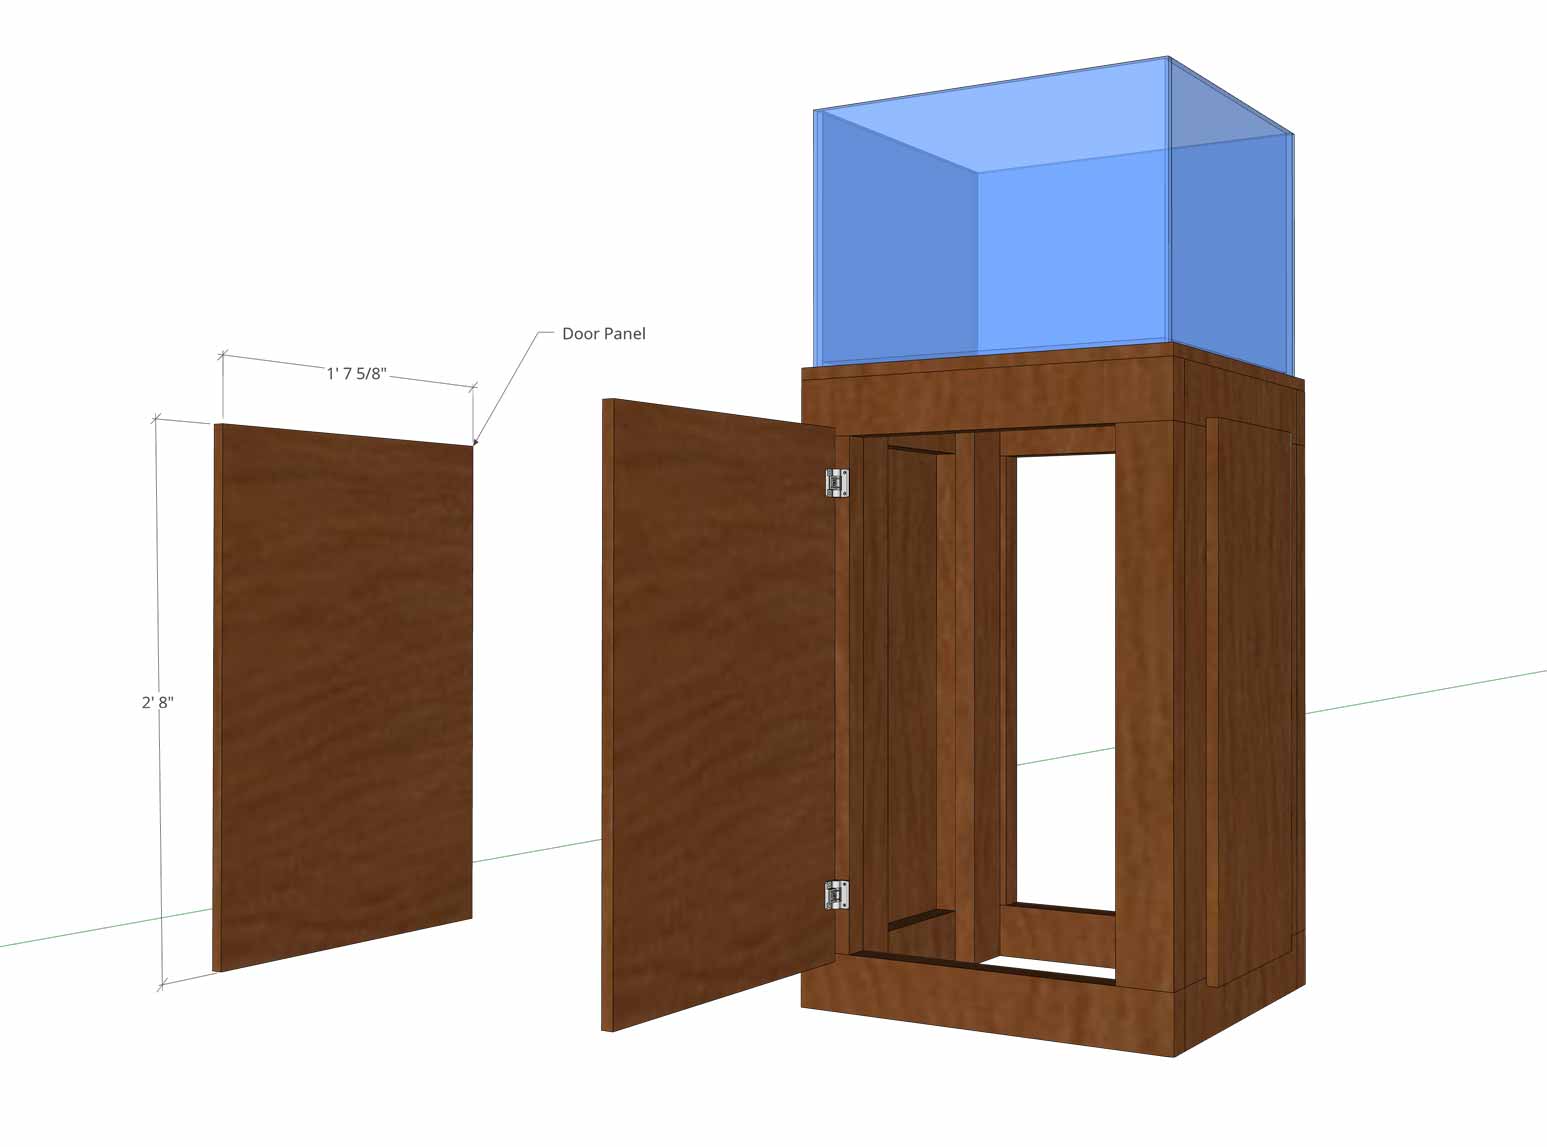
Step 10: Attach The Door (Optional)
To attach a door you’ll need some cabinet hinges and cabinet door pads.
You may also want to get a door pull or you could cut notch into the door to act as a handle.
Step 11: Add Trim (Optional)
Measure out leftover wood from your 2x4s to attach to the top sides of the stand. Like the rest of this project, feel free to go your own way with how you approach the execution. This guide is meant as just that, a guide to follow where you can add your own flair where you would like it. Attach the trim to the upper perimeter of your stand with wood glue
Step 12: Sanding & Staining (Optional)
My favorite part. Sanding and staining feel very therapeutic to me so I encourage you to take your time and enjoy the process. First, you want to sand to make the overall appearance look more finished. The sanding will also help with the application of stain later in the process. You should use sandpaper that is finer so that you have a smoother. Sand everything open to the air from the trim to the walls to the exposed structure on top. Note: if you use coarser sandpaper you risk taking too much wood away and you might have a more worn appearance to the finished project.
When you begin staining, you will want to pay attention to the type of stain that you are using. You want the stain to be designed for the type of wood that you chose to build with. Apply 2-3 coats of stain to protect it. You can even paint your stained stand if you wanted to but if you do you should wait for the stain layers to be completely dry before proceeding.
Key Takeaways
- Water and glass are heavy. Your number one concern should be supporting the weight of your aquarium and everything that is going inside of it. Make sure to calculate how heavy your tank will likely be filled and compare it to the type of wood that will be making up the bulk of your support frame.
- Golden rule: measure twice and cut once. Take your time building your frame as it’s the most important piece to the entire structure. Cut the piece slowly and methodically.
- Going off the last point, give your stand frame the time to dry it needs if you are using wood glue.
How much does it cost to build an aquarium stand?
How much it costs to build an aquarium will depend on a few things like how large and sturdy are you trying to make your stand? You will need to consider the wood that you are using and any tools that you might need to successfully carry out the different tasks associated with the project. It will also depend on how fancy you are trying to make your stand. If you are only concerned about the practical uses of your stand, you will have a cheaper project to carry out. Here are a few overview plans and their relative cost so you can better get an idea of where your own project may land on the budgetary scale.
A basic stand (just holds the weight of the combined weight of the tank and its inhabitants) for a 55-gallon tank could be as little as 60 dollars given you have the tools necessary.
A 200-gallon tank could be made for roughly 200 dollars which doesn’t sound cheap but when you compare it to stands of equal load burying capacity, you begin to see that doing the project yourself is the way to go.
What kind of wood do you use for a fish tank stand?
What kind of wood you want to use will largely depend on what kind of aesthetic you are looking to create with your saltwater tank. However, a good place to start is with hardwood or basic lumber. Hardwood has a great look to it and has an on of options to choose from. It is super sturdy, hence the name, but it is also more expensive than basic lumber. Lumber will save you money and you can always paint or skin it to give it a more appealing look rather than going big and splurging for the hardwood.
It largely depends on what you want your stand to look like after you are all done constructing it. Some wood will be easier to change the appearance of than others so it is good to know what you want to do with the wood from stage one to completion. You also want to make sure that you can waterproof your wood since it will be holding up water for the foreseeable future. A reminder that treated wood is not waterproof wood because it is designed as a preventative measure against bugs and not water.
What makes a good aquarium stand?
A good aquarium stand will hold the weight of your tank and will provide support for any equipment that you might be running for your saltwater tank’s system. This is your chance to design the stand and the plumbing all together to create a system that works without any additional jury-rigging.
Of course, you can even repurpose an existing cabinet that you already own or go to your local junkyard to find a piece that might suit your needs. This could be a great way to reduce the time you need to actually build the cabinet while at the same time making it extremely affordable. However, if you use this option, you want to make sure that the cabinet that you are using was properly cleaned and, if necessary, has been waterproofed in case of any accidents occurring during or after installation of your saltwater aquarium.
Weight distribution is important to consider. You are placing a glass tank that can weigh anywhere between 100 lbs. and 2100 lbs. after all the water and substrate have been added to the tank. We have all heard of the story of David and the Goliath. You need some bottom support to make sure that your tank doesn’t tip right over from all its top weight. It only takes one excited dog or a curious child to send the tank one way or the other. That SOUNDS dangerous but that is only if you are not thinking of the supports.
Finally, think about the equipment you plan to install for your saltwater tank. The type of equipment and routine you will be planning for yourself might influence the design you want to implement for your final project. How are you going to access the different pieces of equipment? Will you be able to reach everything without any issues? Where will the tank be located? Is it against a wall, in a corner, or in the middle of the room? These are questions you should be asking yourself so you can have an aquarium stand that will be the most beneficial to your care routine. Consider what kind of plumbing you may want to use for your tank? Maybe you would like to make the plumbing more discreet by making a stand that will hide the pipes and valves while allowing you easier access to them? These are the kind of questions you should be asking yourself as you think about a design for your aquarium stand.
There are also a lot of premade designs online that you can choose from in case you are willing to build but not willing to plan. That’s okay. It can take a lot of time to design a stand especially if you are new to woodworking. To get your feet wet, it might be prudent to select a design that is more applicable to your needs.
Final Thoughts
Hopefully, now you are a little more comfortable in planning and executing your aquarium stand construction plans. You can make your stand as fancy or practical as you would like it to be. It is entirely up to you but be sure that you take the time to plan sufficiently beforehand as it will only become more and more difficult to make alterations as you get further into the project. You should also consider whether you might want to design your stand around the needs of the setup that you will be creating. To get an idea of what kind of designs might be beneficial to include in your stand construction consider reading our piece on Bean Animal Overflow as it will help spell out the different plumbing features for your tank. You might even consider making that little cabinet area below your tank something much more integral to the overall design.
Best of luck going forward and I am sure that your fish will appreciate the care that you have placed in making your stand. Plus, it will really help put a spotlight on your tank when you have company over.